Advanced PWA Usage
The examples in this guide follow on from PWA with Onsen UI. If you haven’t already, take a look at that guide to get to grips with the basics of PWAs.
Deploying updates
In our basic PWA guide, we set up the Developer Tools to update the ServiceWorker on every reload. But in the real world, we need to make sure that we can update our app when we need to. Let’s take a look at what happens right now when we try to update our example PWA.
First, ensure Update on reload is unticked in Application > Service Workers. In index.html, change the button’s text to “Tap Me”, and refresh the page. It still says “Click Me” - why? The file is cached in the ServiceWorker, and so the browser never tries to fetch the latest version, even if you are online. Notice that when you reloaded, there was no install in the Console, unlike previously.
The install event only gets called the first time a ServiceWorker is run. This event is where we cache all our important files, and when we request them later, they come straight from the cache. Even though we updated index.html on the server, the ServiceWorker never contacted the server to get it. So, if we want to update our files, we need to make sure that the ServiceWorker’s install event is fired.
We need to do three things to make this happen:
- Change
sw.jsso the browser sees it as a new ServiceWorker, and runs itsinstallevent - Ensure the browser never caches
sw.js, so we can deploy updates instantly - Apply the updates when they arrive
Updating the ServiceWorker
When the browser fetches sw.js, it compares the file byte-by-byte to the one it already has cached. If it has changed at all, it loads the new ServiceWorker. The easiest way to ensure that sw.js is recognised as having changed is to put a comment at the top of the file with a version number. Adding this line is enough for the browser to see it as a different file, even though it is just a comment. If we need to update again, we can simply change the version number.
// VERSION: 2
However, if you reload the page, you will see that your previous changes to index.html still aren’t being shown. This is because the browser keeps sw.js in its own cache, and doesn’t make a server request if the version it has is less than 1 hour old (sometimes it may wait even longer).
Disable caching
The simplest way to prevent the browser from caching sw.js is by configuring the server. We need to set up the server to tell the browser that it should not cache sw.js, and that it should instead check for changes every time the page loads. For testing simplicity, we will set up our server to tell the browser not to cache any files at all. On production, you should only disable caching for the sw.js file. We can set up our testing http-server to disable caching by passing the -c0 argument, as below.
http-server . -c0
Before reloading, make sure to remove the existing ServiceWorker as it is still cached based in the browser. Find sw.js in Application > Service Workers and click Unregister. Reload the page and you will see the button now says “Tap Me”.
Change the button back to say “Click Me”, and change the comment in sw.js to say VERSION: 3. Reload the page. It hasn’t changed! Why? Remember that the whole point of a PWA is to be fast, and waiting for a server response makes it slower. When you reload the page, the old ServiceWorker starts up, and immediately uses the cached files. Meanwhile, the browser checks with the server to see if there is an updated sw.js file. When it finds an updated sw.js, it fires an event to let us know. It does not use it immediately as it could cause instability. Instead, the new ServiceWorker will be used the next time the page loads. Reload the page once more and you will see the button now says “Click Me”.
Notify the user to update
The behaviour above means we actually need to reload a page twice to see our updates. Waiting for two page loads to see new data is annoying, but we can make the process a lot smoother by presenting it to the user as an app-like update process. Modify the ServiceWorker registration code in index.html to add a prompt which asks the user to reload.
<script>
  if('serviceWorker' in navigator) {
    navigator.serviceWorker.register('/sw.js')
      .then(registration => {
        console.log("Service Worker Registered");

        // We don't want to check for updates on first load or we will get a false
        // positive. registration.active will be falsy on first load.
        if(registration.active) {
          // Check if an updated sw.js was found
          registration.addEventListener('updatefound', () => {
            console.log('Update found. Waiting for install to complete.');
            const installingWorker = registration.installing;

            // Watch for changes to the worker's state. Once it is "installed", our cache
            // has been updated with our new files, so we can prompt the user to instantly
            // reload.
            installingWorker.addEventListener('statechange', () => {
              if(installingWorker.state === 'installed') {
                console.log('Install complete. Triggering update prompt.');
                onUpdateFound();
              }
            });
          });
        }
      })
      .catch(e => console.log(e));
  }

  function onUpdateFound() {
    ons.notification.confirm('A new update is ready. Do you want to update now?')
      .then(buttonIndex => {
        if(buttonIndex === 1) {
          location.reload();
        }
      });
  }
</script>
You can test that this works by once more changing the button text to “Tap Me”, and update the sw.js version comment to VERSION: 4. Reload the page, and see the various logs in the console which show the progress of the update process. The prompt is only shown to the user when the install process is finished. This means that all the new files will have already been cached, so the reload will be almost instantaneous for the user.
PWA Score
Chrome offers a great tool called Lighthouse which will analyse your site and give you a PWA score. For a great PWA, you should aim for above 90. Let’s open it up by going to the Audits tab in the Developer Tools. Click Perform an audit…, and select Progressive Web App.
Here is the result from our example site. It has passed most of the PWA tests, but there are two issues.
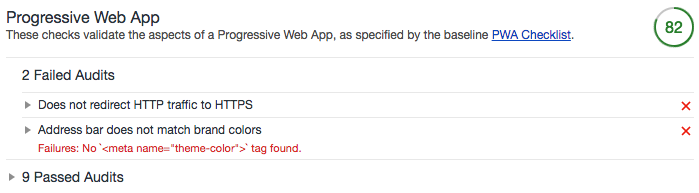
The second issue is easily solved. The theme colour has already been set in the manifest, but we also need to specify it in the HTML. We simply need to add the following tag inside the <head> in index.html.
<meta name="theme-color" content="#ef4e2a">
The first issue is due to the fact that we are testing locally. As mentioned before, PWAs must be served over https. The only exception is when testing locally. However, in this case, the audit is complaining specifically because a request to http://localhost:8080 does not immediately redirect to https://localhost:8080. This is OK for testing, but when you deploy your website online, you must ensure that any requests to http:// are always redirected to https://. Once this is done, you will have a perfect PWA score!
Performance Tips
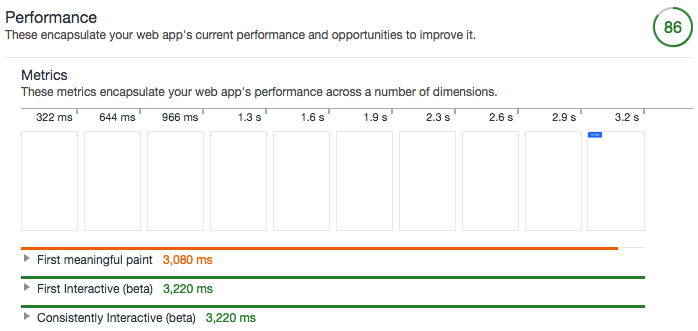
The Audits tool also offers the ability to measure performance. This generally relates to start-up time. The audit of our example site shows a score of 86. This isn’t bad, but the time to first paint is 3 seconds, which is longer than we want.
Use core CSS
Since Onsen UI 2.8.0, it has been possible to use CSS without automatically loading the icon fonts like it normally does. If you do not use these icons, or are happy to load them manually, then you can use onsenui-core.min.css instead of onsenui.min.css. This makes loading the CSS much faster. For our example site, using the core CSS is a good idea since we do not use the icons.
Avoid redirects
In our example site, we are getting the latest version of Onsen UI from the CDN. However, unpkg.com can take quite a while to figure out what the latest version is. Instead, let’s specify the exact version of Onsen UI which we want. This takes the load time for CSS from 540ms to 50ms!
<link rel="stylesheet" href="https://unpkg.com/onsenui@2.9.2/css/onsenui-core.min.css">
<link rel="stylesheet" href="https://unpkg.com/onsenui@2.9.2/css/onsen-css-components.min.css">
<script src="https://unpkg.com/onsenui@2.9.2/js/onsenui.min.js"></script>
Don’t forget, if you change those links, you must also change them in the ServiceWorker.
caches.open('myonsenuiapp').then(cache => {
  return cache.addAll([
    '/',
    '/index.html',
    'https://unpkg.com/onsenui@2.9.2/css/onsenui-core.min.css',
    'https://unpkg.com/onsenui@2.9.2/css/onsen-css-components.min.css',
    'https://unpkg.com/onsenui@2.9.2/js/onsenui.min.js',
    'manifest.json'
  ]);
})
Just these two changes reduce the first paint time by 700ms, and bring our Performance score up to a very respectable 92.
Further size reduction
If you are using a tool such as Webpack or Rollup to build your site, you can use Onsen UI’s ESM modules, which were added in version 2.8.0. This can significantly reduce the size of your site, as your site will only include the parts of Onsen UI which you are actually using. Take a look at our ES Modules guide on how to get started.
Testing on a device
Testing on a device can be difficult as https is required for anything not on localhost. It is possible to use Chrome’s port forwarding to access your computer’s server from a device as if it is localhost.
Android
Our example site has been accessible on our computer from localhost:8080, and we want it to be accessible in the same way from the Android device. First, you will need to either open up an emulator or connect a device using a USB cable.
- Ensure
USB Debuggingis enabled for your device (see the Android docs) - On your computer, navigate to
chrome://inspectin Chrome - Click the Port forwarding… button
- Add a new entry, Port set to 8080, and IP address and port to localhost:8080
- Tick the box at the bottom, Enable port forwarding, and close the dialog
- On your Android device, open
http://localhost:8080and you will see your PWA
You can inspect the site running on your device in the same way you would normally inspect a website on your computer. In the chrome://inspect tab, find localhost:8080, and click inspect. This opens an inspector which you can use as normal.
iOS
Safari allows for remote inspection of devices, but does not support port forwarding like Chrome does. So, it is not possible using Safari’s tools to access the computer’s server as if it was localhost. However, using remotedebug-ios-webkit-adapter, we can use Chrome’s developer tools instead of Safari’s, for testing on an iOS emulator. Follow the remotedebug-ios-webkit-adapter installation instructions. Once it is installed, follow these steps.
- Start up an emulator
- Open Safari on the emulator
- Run
remotedebug_ios_webkit_adapter --port=9000in the terminal - In Chrome, open a new tab, and navigate to
chrome://inspect - Next to Discover network targets, click Configure
- Add
localhost:9000as a target, and click Done
- Add
- Click the Port forwarding… button
- Add a new entry, Port set to 8080, and IP address and port to localhost:8080
- Tick the box at the bottom, Enable port forwarding, and close the dialog
- On the emulator, navigate to localhost:8080, where you will now see your PWA
App icon
If you add the PWA to your home screen on iOS, you may notice that the icon is a screenshot or your app, rather than the icon specified in manifest.json. This is because iOS for some reason ignores the icon fields in the manifest, and instead requires you to add meta tags. Add these inside <head> in index.html
<link rel="apple-touch-icon" sizes="192x192" href="https://via.placeholder.com/192x192">
<link rel="apple-touch-icon" sizes="512x512" href="https://via.placeholder.com/512x512">